
It’s been a while since I’ve written anything, life happens. But I am back and after two weeks of getting my con on I have quite a bit to talk about. First let’s get to what I played last, the Attrishermen.
For those of you not familiar with the list, I have stolen it from Mat Hart after watching him play a few times at the Bourbon Cup and again at Origins. I must say I have become a fan of this list. It is completely miserable to play against. The goal is actually not to score goal with Fish, but to win with takeouts. More specifically, throwing models off the pitch. The list I have been using consists of Corsair, Salt, Sakana, Jac, Kraken, and Fangtooth. In this list Fangtooth has been my top goal scorer as he usually runs up one side of the pitch beating down whoever dares come near then I eventually get him the ball and say hell with it. There is nothing better than watching a fat man dance after scoring.
I have since come to the conclusion that I would like Avarisse and Greede in there over Fangtooth since they do fit the play style better and the extra activation would help. But Fangtooth still holds a spot on the bench along with either Siren or Vet Siren. I will have to test them both out. I also think Tenticles will replace Salt, but then again the rodents ability to fetch the ball and play like Princess has proven valuable.
Many of the questions that I get about this list are “How do you manage to push people off the pitch?” Once you start to understand the basics of what to look for and how to set it up,it actually works quite well. With Avarisse in the mix I would say that you could safely have about 24″ of push in one turn. Much of this is very specific in angle, so it can be tricky, but I will walk you though a choice set-up to help you understand.
Sticking to the plan is not always possible, but when I start a match I will try to look for an opportunity to play out like this. If kicking off I will lead with Corsair and try to put the ball close to the line and away from models who can get it and get away. I want Corsair to be able to start the chain. If I receive the ball I may leave it sit there to temp them after it. Remember that corsair can take the ball when he likes Rough Seas. If it makes you nervous though you can be more conservative and send salt to get the ball. with 13″ he can usually get it and get back far enough.
So my deployment will look something like his. Corsair Moves forward and kicks.

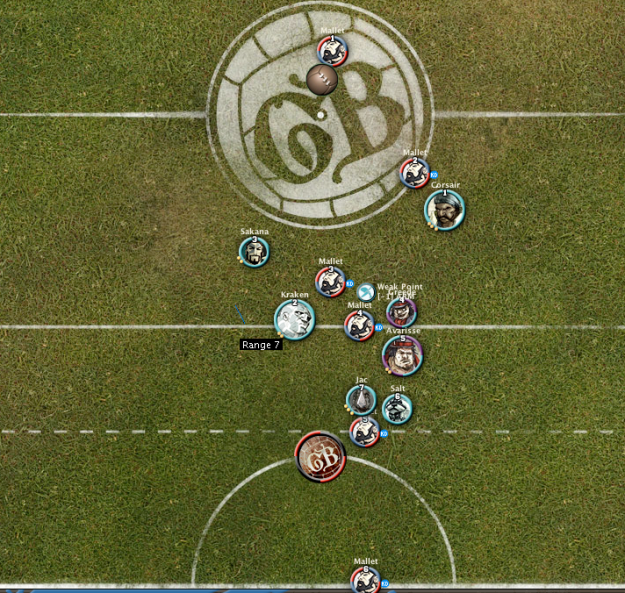
In the picture below I have decided to pick on Mallet, but you should reliably be able to pull this off on any 4/1 or 3/2 model or worse in stats. I have adjusted HPs to represent order of activation and allocated INF. The hope is that Corsair will be able to walk and Harpoon so he has one extra Inf to attack and KD. If you feel he may need to run, You can adjust the INF allocation. I have done this without Avarisse in the mix and Jac can operate on less as well if played smartly.
If you notice I do not pull the model all the way B2B so I can better angle him out of there by the next move. Sakana and Kraken are pretty interchangeable depending on positioning. Here I go first with Kraken pull Mallet on down the line then I charge Sakana in. Kraken can also have another INF as a backup in case the model gets up or Corsair fails to do it. Hopefully Sakana can get a successful wrap to <<>> and add Weak Point to the model. Steamroller has become a very valuable Plot for this list as he or Jac can use it either way, they both like charging.
Up next I moved Greede to help gang up. As I was working out this demo I realized I was really pushing my range I Avarisse would have to charge. With KD, Weak Point and 2 friends in there he should be able to wrap and push 4″ on the charge fairly reliably. Note that by this point you should be generating a bit of momentum and hopefully have the ball in control (or at least the person with the ball in control). It’s not a huge deal if you don’t though. Please send Flint in to score, our fans are looking to meet him next turn.
So finishing things off we have salt coming in to give support. In this case I gave Jac 3, but he really could get the job done on 2 or eve 1 INF. It is all the same and just depends on positioning. He has a total of 7″ he can reliably move people, so if they are over the goal line he should good. If he can get directly behind them he puts up Ramming Speed and bumps them 2 on the move ore charge. If you charge you should get >> at this point but > is usually enough as you don’t want to push more than 3″ away so you can use Trident Tested. The nice thing is he generates his own Momentum, so that is not an issue If he has to finish the job at the start of the next turn.
Of course the plan is likely to go south and things get crazy. They are not called the Attrishermen because they win fast. This list can wear on you as much as your opponent. Especially if they have a lot of pushes and KDs as well. We played an almost mirror match the other day. It was miserable.
I really only have a handful of games with them under my belt at this time, but I like what I see and look forward to getting more experience.
